
Evidence and signs
Do I Have Mice or Rats? How to Tell From the Signs
Start with the evidence that’s hardest to misread — dropping size, or a clear look at the animal — then confirm it with the size of the damage, where the activity happens, and a second or third matching sign. One clue suggests. Several matching clues verify. Nothing on this page is a substitute for that combination.
What did you find? Jump to the evidence in front of you:
Mouse vs rat at a glance
These are typical ranges from university IPM sources, not a measurement standard, and no single row here is enough on its own. A young rat can overlap an adult mouse in apparent body size, so use the pattern across several signs rather than one measurement.
| Sign | House mouse | Norway rat | Roof rat |
|---|---|---|---|
| Body | About ½ oz, 5–7 in total including a 3–4 in tail | 7–18 oz, large and robust | 5–10 oz, sleek and slimmer |
| Muzzle | Pointed, long nose | Blunt | Pointed |
| Ears | Relatively large for the body | Small; don’t reach the eyes when folded forward | Large; reach the eyes when folded forward |
| Tail | Roughly as long as the body (3–4 in) | Shorter than head + body combined | Longer than head + body combined |
| Droppings | About 1/4 in (6 mm), pointed at both ends | About 3/4 in (16–19 mm), thick, blunt ends | About 1/2 in (10–13 mm), narrower, tapered ends |
| Gnaw marks | About 1–2 mm (up to about 1/12 in) across the pair of grooves — fine, small | About 3.5–4 mm (about 1/6 in) across the pair of grooves — heavier, visibly larger. University IPM sources don’t report a further split between the two rat species. | |
| Typical location | Cabinets, drawers, food storage, sheltered indoor spaces | Ground level: basements, foundations, crawl spaces | Elevated: attics, ceiling and wall voids, trees |
| Burrowing / climbing | Excellent climber; uses small gaps and sheltered nesting sites | Strong burrower; generally ground-oriented, but can climb and may also occur in ceiling voids | Excellent climber; usually nests aboveground, but may burrow when elevated nest sites are unavailable |
Full comparison, with scale references: mouse droppings vs rat droppings.
Sign 1 — Dropping size
Before you look closely: don’t pick up, crush, sweep, or vacuum dry droppings to identify them. Photograph or measure them without handling, then follow CDC’s wet-cleanup procedure.
Droppings are one of the strongest clues you have, and you don’t need to touch them to use it. Very small droppings favor a mouse. Much larger droppings favor a rat, and shape can then help separate the two rat species — roof rat droppings run narrower with tapered ends, Norway rat droppings are the biggest and blunter.
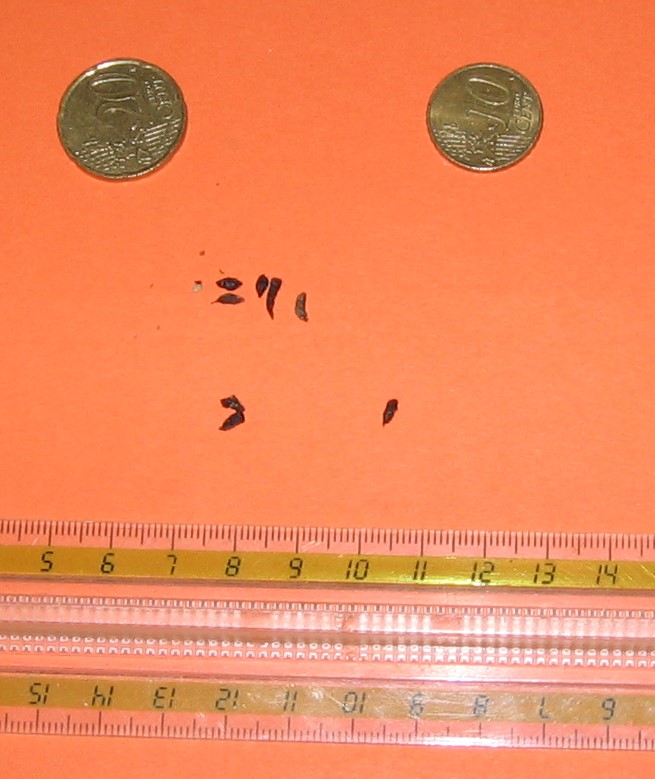
One common shortcut doesn’t hold up: pointed ends alone don’t mean mouse. Roof rat droppings are often pointed too. Size is usually more useful than end shape for separating mouse from rat. Once the droppings are clearly rat-sized, shape can provide additional evidence for distinguishing a Norway rat from a roof rat.
This page gives only the summary above. The full comparison — with scale references, scatter-pattern examples, and location checks that narrow it further — is on the dedicated page: mouse droppings vs rat droppings. And if the question is whether what you found is recent, that one has its own page.
Sign 2 — Body size and proportions
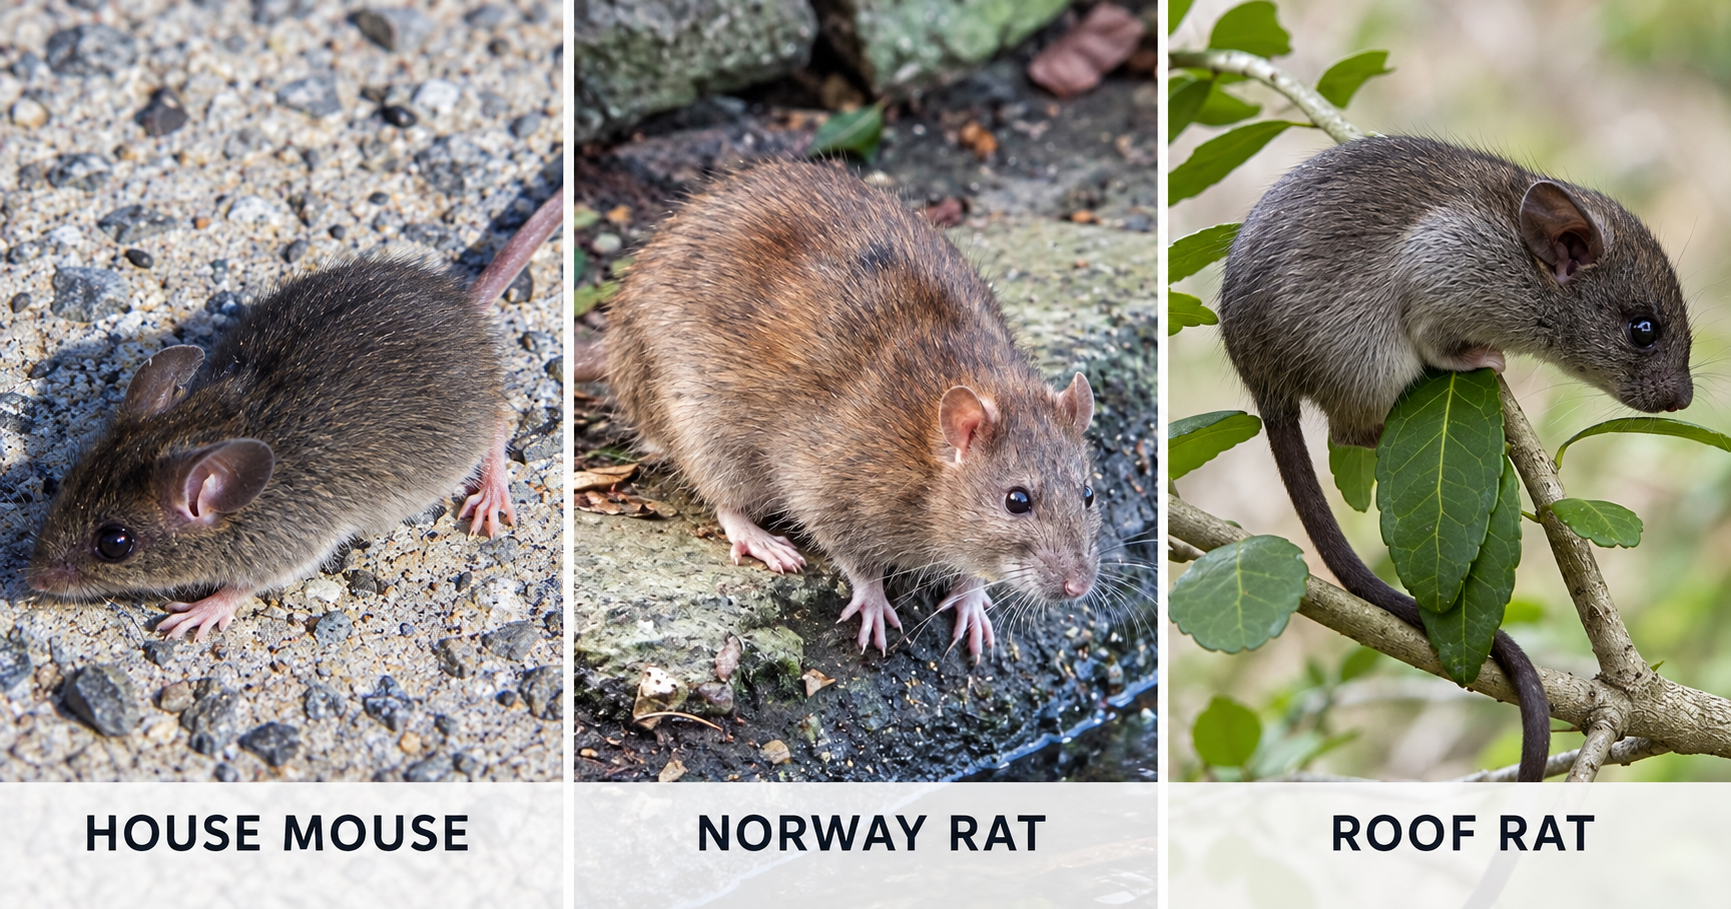
A clear look at the animal, even briefly, is one of the two strongest signs you can get. The three species split out fairly cleanly:
- House mouse — small, about ½ ounce, 5 to 7 inches including a 3–4 inch tail. Relatively large ears for the body, a pointed face.
- Norway rat — large and robust, 7 to 18 ounces, blunt muzzle, ears that don’t reach the eyes when folded forward, tail shorter than its head and body combined.
- Roof rat — sleek and slimmer than a Norway rat, 5 to 10 ounces, pointed muzzle, ears long enough to reach the eyes when folded forward, tail longer than its head and body combined.
One caution worth stating plainly: not every small, mouse-like rodent in a U.S. home is a house mouse. An animal with a sharply white underside and a noticeably furry, two-tone tail may be a deer mouse rather than a house mouse — a distinction that can matter especially in rural and semi-rural settings. It also changes the health picture: CDC names the deer mouse, not the house mouse, among the rodents that spread the hantaviruses causing HPS — what that means in practice.
Sign 3 — Mouse, or juvenile rat?
This is the mistake that catches people who are confident they’ve already made the call. University IPM guidance puts it plainly: very young rats have large heads and feet in proportion to their bodies, while adult mice are proportionately much smaller. A young rat can be small enough to resemble an adult mouse. Its disproportionately large head and feet are therefore more useful clues than body size alone.
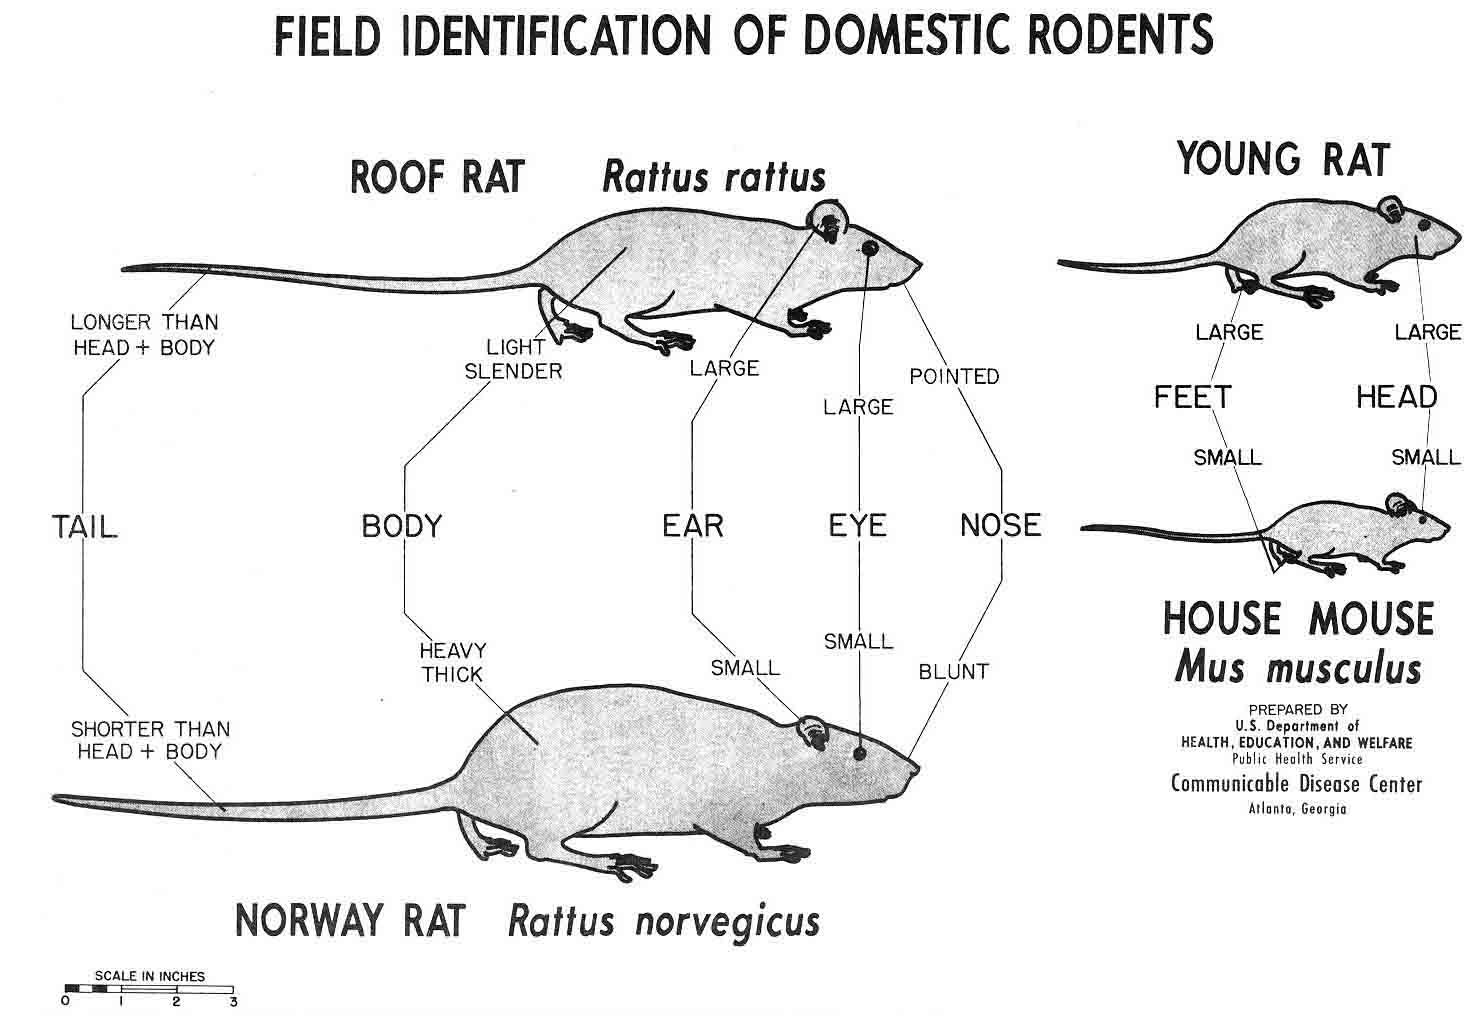
If the body looks slightly “off” — head or feet that seem too big for the rest of the animal — treat that as a reason to look for a second sign (gnaw-mark width, location, a burrow) rather than settling on mouse from body size alone. If you got a clear look at the animal itself, how to tell a mouse from a rat walks through the young-rat check in more detail, along with Norway rat vs roof rat.
Sign 4 — Gnaw marks
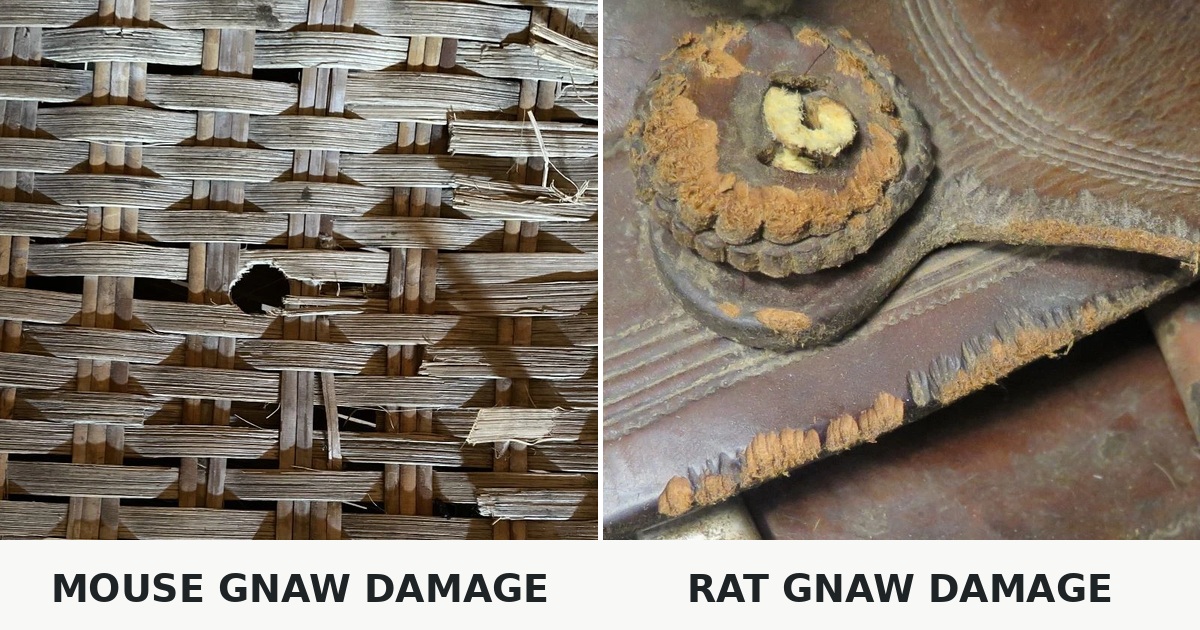
Scale is the useful part here. Cornell IPM measures the pair of front-tooth grooves at about 1–2 mm (up to about 1/12 in) for an adult mouse and about 3.5–4 mm (about 1/6 in) for an adult rat — roughly double. Mouse damage reads as fine and small, rat gnawing as heavier and visibly larger. Treat width as supporting evidence, not proof: the figures describe adults, and partial marks or soft materials can mislead. How to read gnaw marks on wood, plastic, food packaging and wiring covers measuring them, telling fresh damage from old, and what to do about chewed wiring.
Sign 5 — Where the activity is
Location is useful as probability evidence, not proof. It changes the odds; it doesn’t decide the species. University IPM sources describe the general tendencies, and they are tendencies, not rules — Norway rats can turn up above ground, and roof rats sometimes burrow.
- Norway rat pattern: ground level — basements, foundations, crawl spaces, ground-floor access, rubbish or woodpiles, gardens.
- Roof rat pattern: elevated — attics, ceiling and wall voids, cabinets, trees and dense shrubs, utility lines. Roof rats “usually live and nest aboveground,” and when they do get into a structure they tend to stay high.
- House mouse pattern: sheltered indoor spaces close to food — drawers, cabinets, food storage, garages, behind boxes.
Don’t over-read this one: an animal in the attic is not automatically a roof rat, and an animal in the basement is not automatically a Norway rat. Use location together with the animal’s size, the droppings, or the gnaw marks, not on its own.
Sign 6 — Burrows
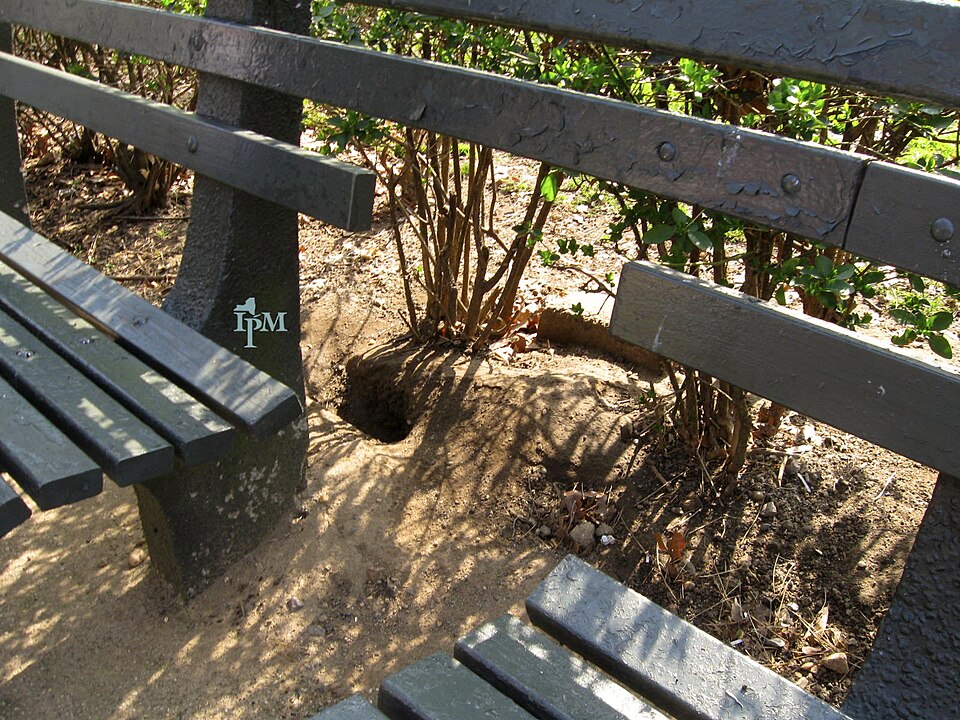
A burrow is a relatively strong clue for a Norway rat, especially outdoors along a foundation, under rubbish or a woodpile, or around a garden. Combined with large droppings, heavier gnaw marks, and ground-level activity, a foundation burrow builds a much stronger rat case than any single sign alone — but on its own, and especially if the rest of the evidence points elsewhere, don’t treat a burrow as proof by itself.
Sign 7 — Entry openings
Use this one carefully; it’s a constraint, not proof. Current CDC guidance is specific about mice: they can fit through an opening about 1/4 inch (6 mm) across — roughly the width of a pencil. Current university IPM guidance for rats is a general figure, without a further split by species: rats of either species, especially young rats, can squeeze through a gap of about 1/2 inch.
The logic runs one direction only. A very small opening supports a mouse diagnosis, because an adult rat likely can’t fit through it. A large opening does not prove rat — a mouse can use a large opening just as easily as a small one. A 1-inch gap tells you rodents can get in; it doesn’t tell you which species did. Either way, an opening that size needs closing — how to seal mouse entry points covers finding them and the materials that hold.
Sign 8 — Rub and smudge marks
Greasy rub or smudge marks along a repeated route — a baseboard, a beam, the edge of a pipe — confirm that something is using that path regularly. They’re useful for confirming activity. They’re weak, used alone, for telling you which species: don’t use a rub mark by itself to call mouse or rat.
Sign 9 — Tracks
Footprints and tail-drag marks in dust or fine debris can confirm movement through a space, but scale is easy to misread, surface quality changes how a print looks, and other small animals can leave similar tracks. Treat tracks as supporting evidence unless the print is unusually clear and you can measure it against something of known size.
Sign 10 — Nests
House mice build nests from finely shredded paper, fabric, or other soft fibrous material, tucked into a sheltered spot — behind boxes, in a drawer, in a garage. Rats nest behind stored objects, in garages, in woodpiles, or in wall and ceiling voids; Norway rats often nest underground in burrows instead, and may line the nest with leaves, shredded paper, or cloth. Roof rats have strong nest-site affinity; UC IPM notes that they may return if the nest site itself is not removed during sanitation.
Shredded paper on its own doesn’t tell you which species — both use it. Nest material and location are supporting evidence, not a standalone identification. If you have found one, what a mouse nest looks like, how to tell if it is still in use, and how to remove it safely.
Sign 11 — Sounds
Scratching, scurrying, or gnawing at night supports the conclusion that something is active in a wall, ceiling, or void — but sound intensity is subjective, building construction changes how loud the same animal sounds, and squirrels, bats, or other small animals can produce similar noise. Sound alone can’t reliably separate mice from rats, and loudness is no exception. Treat it as a reason to look for a second sign, not a diagnosis by itself. What night scratching can and cannot tell you covers timing, location, and the checks that rule out non-animal causes.
Sign 12 — Odor and daytime activity
A musky odor can build up with an established mouse presence, but moisture, a dead animal, or food waste can smell similar, and odor alone doesn’t tell you which species you have. Treat it as supporting evidence only. What a mouse urine smell can and cannot tell you covers where to look, how to use a black light without over-reading it, and how to get rid of the smell safely.
Daytime sightings are also weaker evidence than they’re usually given credit for. Current university IPM guidance is that house mice are mostly active at night but can be seen occasionally during daylight, depending on food availability — so a mouse seen in daylight is not, by itself, a sign of a severe infestation. Weigh a daytime sighting together with everything else you’ve found, not as a stand-alone severity test.
Put the evidence together
Cornell’s IPM program makes a point worth carrying through this whole page: a sudden pile of droppings can be alarming, but on its own it doesn’t prove a full-blown infestation, and a single ambiguous clue doesn’t prove a species either. Look for which pattern below several of your signs actually match — not just one.
How many animals are behind those signs is a separate question: how many mice the evidence can actually support.
Pattern more consistent with a house mouse: very small droppings, a small body with proportionate head and feet, fine gnaw marks, activity around cabinets, drawers, food storage, or other sheltered indoor spaces, and the ability to use very small openings.
Pattern more consistent with a Norway rat: substantially larger, blunt-ended droppings, a robust body with a blunt muzzle and small ears, heavier gnawing, ground-level activity, and a burrow along a foundation.
Pattern more consistent with a roof rat: rat-sized droppings that are often more pointed than a Norway rat’s, a slimmer build with a pointed muzzle and large ears, a tail longer than the head and body, and attic or elevated activity with strong climbing sign.
Still unsure? That’s a legitimate outcome, not a failure to identify correctly. Don’t force a conclusion the evidence doesn’t support. Photograph and measure what you’ve found without handling it, keep monitoring for new sign, and bring in a professional inspection if the identification would change how you deal with it — the control approach for mice and for rats isn’t identical. Traps are one example: mouse traps and rat traps are different sizes.
The bottom line
The goal isn’t to identify mice or rats from one ambiguous clue. Start with the strongest evidence — dropping size or a clear sighting, ideally both — then confirm it with the size of the damage, where the activity happens, and whether there’s a burrow or strong climbing sign. If the evidence conflicts, treat the identification as uncertain rather than forcing an answer. Once you know what you’re dealing with, the cleanup procedure — and what the health risk actually is — tell you what to do next. If it is mice, the full plan is in how to get rid of mice; if it is rats, see how to get rid of rats.
Sources & verification
- CDC — How to Seal Up to Prevent RodentsThe 1/4-inch (6 mm) mouse entry-opening figure.
- CDC — How to Clean Up After RodentsReferenced for the safe-handling instruction: don’t sweep or vacuum dry droppings.
- UC IPM — RatsNorway rat vs roof rat body weight, muzzle, ear, tail and build differences; burrow locations; location and climbing/burrowing tendencies, including ceiling-void infestations in Norway rats; the general 1/2-inch gap figure for rats; the juvenile-rat vs adult-mouse proportion distinction; nesting behavior.
- UC IPM — House MouseHouse mouse body size and weight, ear and muzzle description, daytime-activity nuance, climbing ability, and nest locations/material.
- Cornell IPM — Managing Mice and RatsThe caution against reading a sudden pile of droppings as proof of a full infestation, and the general principle of monitoring over a single observation.
- Cornell IPM — Mouse and Rat Biology and BehaviorHouse mouse, Norway rat, and roof rat dropping-size ranges and general evidence characteristics; gnaw-mark width across the pair of incisor grooves (about 1–2 mm for an adult mouse, 3.5–4 mm for an adult rat).